
Sometimes it’s fun to think outside the box. Who knows, you might come up with the craziest ideas… Like I did this weekend 🤪
Raising the excitement
It all started earlier this week when I was implementing 5-star rating feature to my Planner Gantt Chart app. That version of the app is not yet published and I will write a separate blog post regarding that, too – I just had to drop that for a while as I got this crazy idea of enabling sending and receiving data to and from a canvas app without using any connector.
What the heck am I talking about? How is it possible to send data from a canvas app or receive data to the app without using connectors? I mean, isn’t the whole idea of connectors just that: to enable data transfer between your app and the backend API’s?
Let’s first take a look at the below picture where I have described the setup of my experiment.

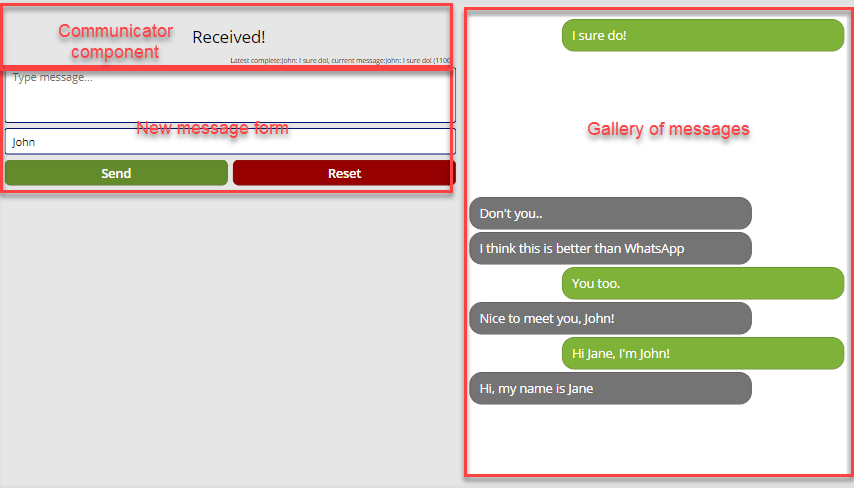
John and Jane are both using the same experiment app in their respective Power Platform environments. The environments can reside in different tenants (as it is in my test setup). The app allows users to have a WhatsApp like conversation with each other.
When Jane types in a new message and clicks on the Send button, the message is passed on to an Azure Function App endpoint. Function stores the message into a Storage table. All instances of the app constantly poll the function endpoint to receive the latest messages.
Nothing too complex here, right? (Admitted, it would be really easy to communicate with the function endpoint using a custom connector or a Power Automate flow combined with an HTTP connector)
But this time, we are enabling the setup described above without using any connectors!
Whaaaat!?!
Revealing the secrets
What I am using to make this all work without connectors, is an HTML text control with a single img tag as its contents. The img tag’s src attribute points to the function endpoint and the function returns an alternating height and one pixel wide image. Now, if you have the Auto height property of the HTML text control turned on, the height of that control changes based on the height of the image returned by the function!
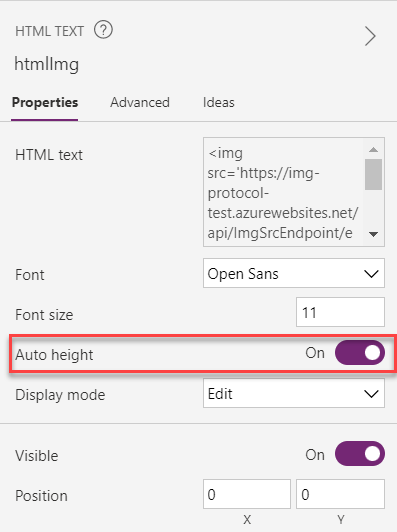
Since the function can basically control the height of the HTML text control, we can use the Height property of the control to determine the characters we are receiving from the function 🥳
Sending new messages to the function endpoint is a lot more simpler: we can pass the messages by embedding them as part of the image URL path.
This setup constitutes of three parts:
- Canvas component handling communication with the function endpoint and image height interpretation into characters
- Canvas app utilizing the component and providing UI to the end user to send and view messages
- Azure function and storage table to handle receiving messages and sending images with alternating height
I will explain each part in the following sections, but let’s first take a look at how the app functions in real life. Check out the recording below! John’s screen is on the left and Jane’s on the right.
Canvas component
This component is responsible of communicating with the backend function endpoint. As already revealed earlier, the component is using HTML text control with a single img tag to do the actual communication with the endpoint.
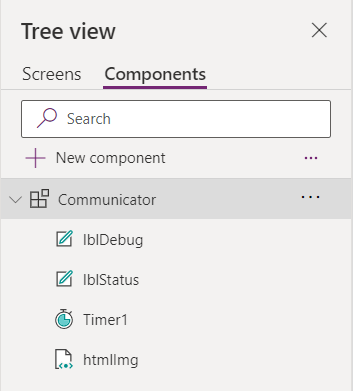
My component is called Communicator and it consists of the following controls. Timer1 and htmlImg being the most important ones and explained next.
Timer1
This timer is run periodically. It is responsible of setting certain variables that are used by other controls of the component. The Power Fx code of timer’s OnTimerEnd property is below.
If (
    htmlImg.Height = varNewMessageValue,
    // Start reading a new message
    Set(
        varMessage,
        ""
    );
    Set(
        varStatus,
        "Receiving message..."
    );
    Set(
        varTimerDuration,
        100
    );
    Set(
        varCharIndex,
        0
    ),
    If(
        htmlImg.Height = varEndMessageValue,
        // Complete message read
        Set(
            varLatestCompleteMessage,
            varMessage
        );
        Set(
            varCharIndex,
            -1
        );
        Set(
            varStatus,
            "Received!"
        );
        Set(
            varTimerDuration,
            1000
        );
        Communicator.MessageReceived(varMessage),
        If(
            htmlImg.Height >= 32 && htmlImg.Height <= 122,
            // Currently reading message
            Set(
                varMessage,
                varMessage & Char(htmlImg.Height)
            );
            Set(
                varCharIndex,
                varCharIndex + 1
            ),
            Set(varStatus, "No messages")
        )
    )
);
Set(
    varCacheInvalidator,
    GUID()
);
Set(
    varMessageToBeSent,
    Coalesce(
        Communicator.OutgoingMessage,
        "NOT_SET"
    )
);
As we can see in the above code, it uses HTML text control’s (called htmlImg) Height property to determine what to do. There are two predefined height values that are handled in a specific way:
- varNewMessageValue: when this value is received from the function, the component expects to start receiving a new message
- varEndMessageValue: receiving this value means that the current message has been received in whole
If the received value is neither of the above, the height value is converted into a character using Char function and concatenated with the characters received so far.
htmlImg
Using HTML text control with img tag is the “secret” ingredient of this experiment. Control’s HtmlText property’s code is below.
"<img src='https://img-protocol-test.azurewebsites.net/api/ImgSrcEndpoint/" &
varCacheInvalidator & "/" &
varCharIndex & "/" &
EncodeUrl(varLatestCompleteMessage) & "/" &
EncodeUrl(varMessageToBeSent) & "/" &
Communicator.UserName
& "/img.jpg' />"
As we can see, all necessary data is passed on to the function endpoint as part of the URL path. The part are:
- varCacheInvalidator: This is a GUID that is regenerated in every cycle. By using this we can be sure that a fresh image is always fetched from the endpoint and no cache is used.
- varCharIndex: We pass this to the endpoint so that the function knows which character (= used image height) to return next.
- varLatestCompleteMessage: We pass this to the endpoint so that the function knows which one of the messages in the storage table it should process for this specific request.
- varMessageToBeSent: If provided, the endpoint will store this message to the storage table (and hence eventually broadcasted to all clients).
- Communicator.UserName: Each message stored in the storage table is prefixed with this value.
Component’s custom properties
The component exposes the following custom properties so that it can be easily used by the containing canvas app.
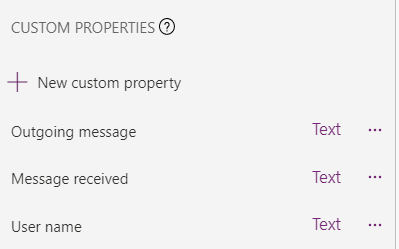
- Outgoing message: The app will use this input property to pass a message from the user to the function endpoint.
- Message received: The app can use this behavior property to handle messages received from the function endpoint.
- User name: Value of this input property is passed on to the function endpoint so that messages can be prefixed with user’s name.
So, now that we have the canvas component explained, let’s take a quick look the actual app that is using it!
Canvas app
The app consists of three main areas:
- Communicator component
- New message form
- Gallery of messages
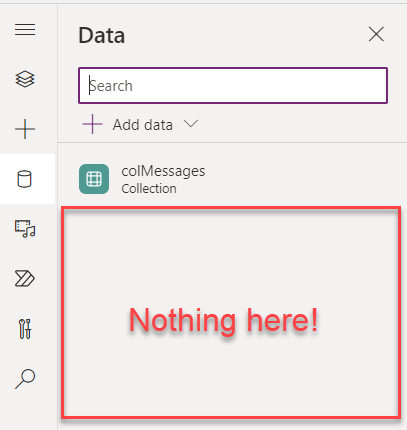
But what’s really, REALLY interesting is to take a look at the Data tab and see all the connectors this app is using – none whatsoever!
Azure function
The last but not least part of the experiment is the function endpoint that receives input data embedded into URL and returns a Bitmap of desired height and of width 1.
Run function code is below.
        [FunctionName("ImgSrcEndpoint")]
        public static async Task<IActionResult> Run(
            [HttpTrigger(AuthorizationLevel.Anonymous, "get",
            Route = "ImgSrcEndpoint/{clearCache}/{charIndex}/{latestCompleteMessage}/{newMessage}/{user}/img.jpg")] HttpRequest req,
            string clearCache,
            int charIndex,
            string latestCompleteMessage,
            string newMessage,
            string user,
            ILogger log)
        {
            log.LogInformation("charIndex: " + charIndex);
            log.LogInformation("latest: " + latestCompleteMessage);
            log.LogInformation("new: " + newMessage);

            try
            {

                var tableHelper = new TableHelper(
                    System.Environment.GetEnvironmentVariable("StorageUri"),
                    System.Environment.GetEnvironmentVariable("StorageAccount"),
                    System.Environment.GetEnvironmentVariable("StorageKey"),
                    log
                    );

                var message = await tableHelper.GetNextMessage(latestCompleteMessage);
                log.LogInformation($"Next message: {message ?? string.Empty}");

                await tableHelper.AddMessage(newMessage, user);

                // New message available
                var newMessageCode = GetCodeToMatchHeight(1000);
                var endMessageCode = GetCodeToMatchHeight(1100);
                var noMessageCode = GetCodeToMatchHeight(666);

                var returnCode = newMessageCode;

                if (string.IsNullOrEmpty(message))
                {
                    charIndex = 9999;
                    message = "";
                }

                if (charIndex < 0)
                {
                    returnCode = newMessageCode; // Tell the client we have a new message waiting
                }
                else if (charIndex >= message.Length)
                {
                    returnCode = endMessageCode; // Tell the client that the entire message is sent
                }
                else
                {
                    // Get char at index and convert to ASCII
                    var c = message[charIndex];
                    log.LogInformation($"{c}");
                    returnCode = GetCodeToMatchHeight((int)c);
                    log.LogInformation(returnCode.ToString());
                }

                var img = new System.Drawing.Bitmap(1, returnCode);
                using (var ms = new MemoryStream())
                {
                    img.Save(ms, System.Drawing.Imaging.ImageFormat.Jpeg);
                    return new FileContentResult(ms.ToArray(), "img/jpg");
                }
            }
            catch(Exception ex)
            {
                log.LogError(ex.Message);
                log.LogError(ex.StackTrace);
            }
            return new NoContentResult();
        }
- 4-9: Route of the function expects certain data already discussed in earlier sections of this article.
- 19-24: Initialization of TableHelper instance that wraps some code to handle storage table data read and write. The class provides two public self explanatory methods:
- AddMessage(string msg, string user)
- GetNextMessage(string previousMessage)
- 32-34: Defining some preset values that are “agreed upon” between the function endpoint and the Communicator component.
- 38-42: If there is no message to be returned we force the execution to end up in the if branch defining the return value to be “entire message is sent”.
- 54-58: This code block converts the next character into image height value.
- 61-66: Creates a new bitmap image of calculated height and returns it to the client.
Disclaimer: The code above should not be taken as a textbook example of how to write good code 😅 It serves the purpose as is – being an experiment to prove a point.
Thoughts
I had really fun doing this experiment! At first, I wasn’t sure it would even work, but it does. And that’s only work done over one weekend (and I have been doing other things as well, like sleeping 😉). The implementation is not even close to be production ready, but it proves the concept functional.
Here are some random thoughts about this approach:
- Data transfer rate is really bad, so you can’t use this mechanism to replace actual connectors when talking about data centric applications.
- Height of the HTML text control responds surprisingly well to the height of the image it contains. I was prepared to having to code some range handling, but thankfully that wasn’t necessary in the end.
- If you enhance the Communicator component and Azure function code a bit, you can isolate the complexity and ugliness of the solution pretty nicely and have quite a solid mini message broker in your hands.
- I could consider using this sort of approach on scenarios, where you have e.g. company wide application in use, a need to exchange small amounts of data between users or users and backend systems.
- To my understanding this is the only way to have a connection to a backend system baked into a component. This might be useful if you have e.g. CoE provided component library that needs to cater some backend data to containing apps.
At the end, I do not know of licensing implications of this approach, or whether using this sort of solution in real-life scenarios is in conflict with Microsoft’s terms and conditions. This was just a technical journey to experiment whether this can be even done.

1 Comment