
…I mean – really say it…
ChatGPT is amazing! It’s so amazing that I wanted to create another kind of UI for it. Imagine if you could chat with ChatGPT while driving to work for example. So that you could ask your questions out loud and that ChatGPT would speak the answer back to you.
Well I created a Power Apps app just for that! I call it HAL-GPT-3. And what’s even better, it’s all packed into a solution file that you can go ahead and download and import into your own Power Platform environment. The solution is available in my HAL-GPT-3 GitHub repository. The repository also lists some other ingredients that you need to setup to get things working.
This blog post explains how it’s stiched together.
But before going any further, check out the app in action via the below recording! (Make sure you unmute your speakers…)
Introduction
Check out the below picture – it pretty well explains how the whole overall process goes and which artifacts are in play during the process.
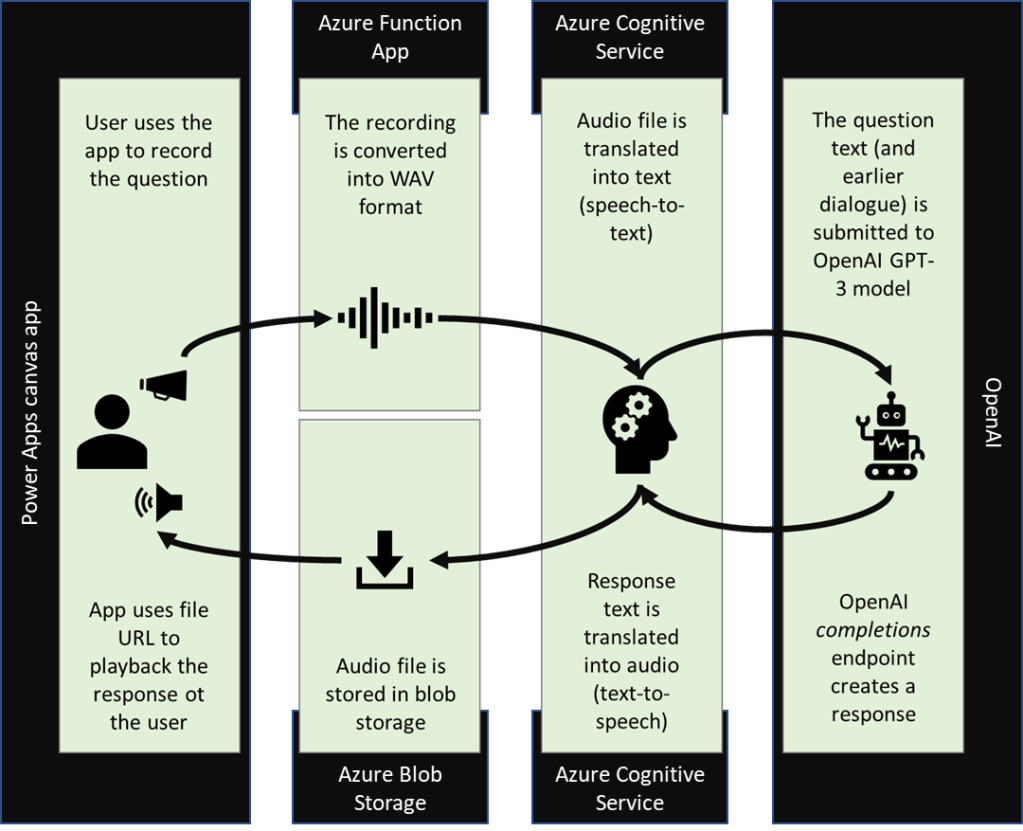
Process steps:
- User uses app’s microphone control to create a recording of the question.
- The recording along with possible earlier dialogue is sent to a Power Automate flow.
- Flow sends the recording to Azure Function App that converts the audio into WAV format that is accepted by Azure Cognitive service.
- The audio file is sent to Azure Cognitive service to translate it into text.
- Text is combined with possible earlier dialogue and sent to OpenAI’s completions API endpoint.
- OpenAI’s response text is sent to Azure Cognitive service to translate the text into audio.
- Audio is stored into Azure Blob Storage.
- URL of the audio along with user’s question text and OpenAI’s answer text are sent back to the app.
- Dialogue is displayed to the user and the audio response is played.
Power Apps app
Let’s first take a look at app’s features.
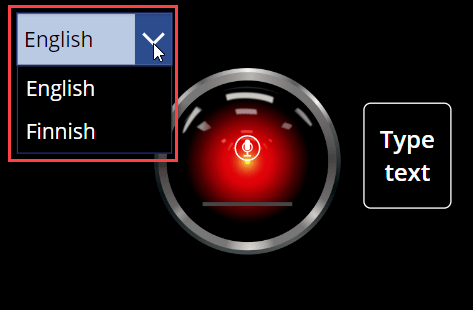
The main feature is the red eye of HAL 9000 from movie 2001: A Space Odyssey. Don’t worry, this eye does not watch you, it’s merely a microphone button that you can click to start recording of your question or request. The recording is stopped when the user clicks on the eye again.

Another way to ask a question is to type it in via Type text button. The button was added to the app because conversion from the original audio into WAV format took such a long time. By providing the text directly, we can skip steps 3 and 4 from the process steps listed earlier.

Another interesting feature is the language selection. It currently supports only English and Finnish, but it is trivial to add more languages as well.
If you want to add more languages, all you need to do is to add them to app’s OnStart property.

You need to check for an appropriate voice matching your language from language and voice support table. (Make sure your desired language exists on both Speech-to-text and Text-to-speech tabs!)
The conversation you have with HAL-GPT-3 is collected at the bottom of the screen.

Important part of the solution is, that your earlier dialogue is used when sending user input to OpenAI API. This is the way we can preserve the context of the coversation and OpenAI knows what we are talking about. For example, let’s continue the above humorous dialogue.
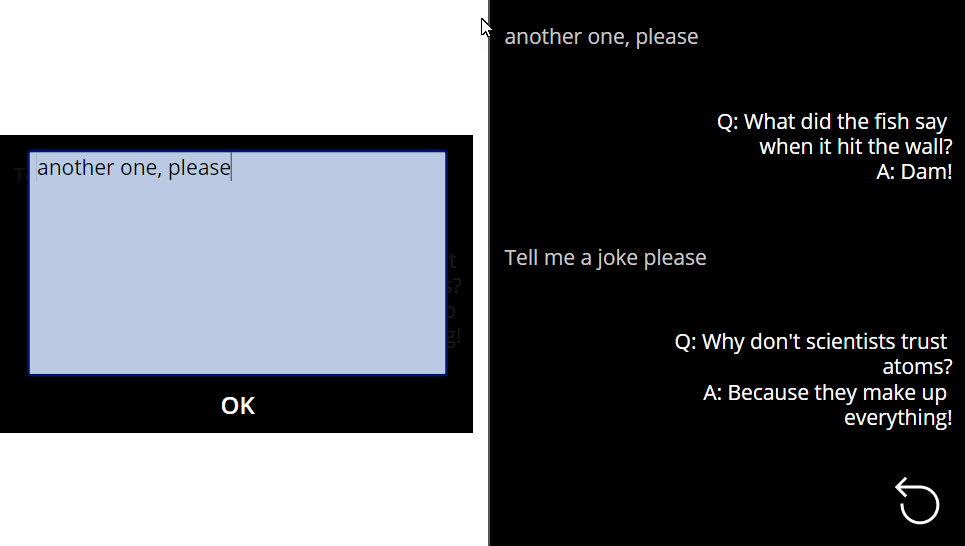
As you can see, the app know about our context – it knows that I am requesting a new joke when I’m merely asking “another one, please”.
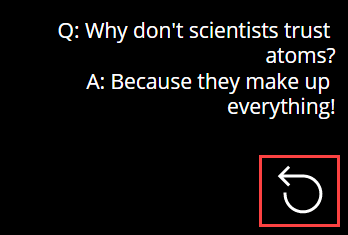
You can use the reset button at to bottom right corner of the app to clear the chat history and to start from the clean slate.
The most important part of the functionality from app’s implementation perspective is in the OnSelect property of the hidden btnSend button that is automatically clicked when user stops the recording. The Power Fx code is below.
Set(
    varSending,
    true
);
Set(
    varStartPlayback,
    false
);
Set(
    result,
    'HAL-GPT-3'.Run(
        If (IsBlank(varJson), "data:audio", varJson),
        If (IsBlank(varAudio), SampleAudio, varAudio),
        selectLanguage.Selected.code,
        selectLanguage.Selected.voice,
        varChatHistory,
        Coalesce(varTypedInQuestion, "1")
    )
);
Collect(
    results,
    {
        result: result,
        timestamp: Now()
    }
);
Set(
    varChatHistory,
    varChatHistory & result.original_text & Char(10) & result.response_text & Char(10)
);
Set(
    varSending,
    false
);
Set(
    varAudioUrl,
    result.audio_url & "?" & GUID()
);
Set(
    varStartPlayback,
    true
);
Set(
    varTypedInQuestion,
    ""
);
The most interesting part is on lines 9-19 where we call our HAL-GPT-3 flow to do the actual processing. We pass in the following properties:
- This is the recording record created in microphone control’s OnStop property like this:
Set(varJson, JSON(Microphone1.Audio, JSONFormat.IncludeBinaryData)); - This is the actual audio contents of the recording. It is also created in microphone control’s OnStop property:
Set(prefixLen, 25); // WEBM
If(CountRows(Split(varJson, “audio/aac”)) > 1, Set(prefixLen, 24)); // iPhone
Set(varAudio, Mid(varJson,prefixLen,Len(varJson)-prefixLen)); - Selected language code (e.g. en-US)
- Selected voice (e.g. en-US-tonyNeutral)
- Chat history as text
- Typed in text (if any, otherwise “1”)
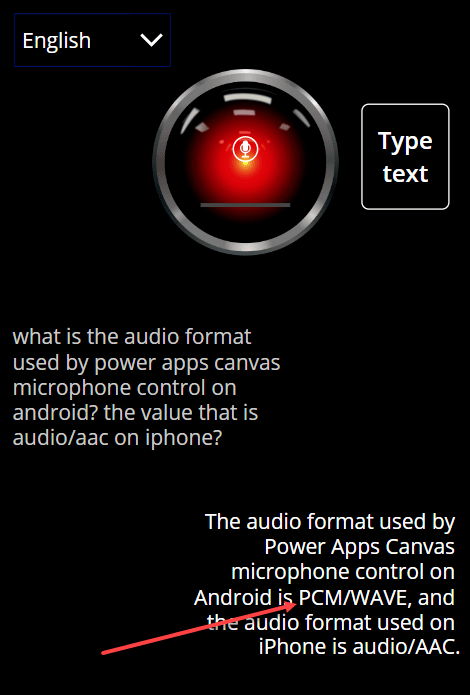
Note: You might notice above, that Android phone is not supported. That’s because I didn’t have such a phone at my disposal. But HAL-GPT-3 says it’s audio/wave, which means the app should work on Android as it is, since the length of the format prefix matches that of browser recording (WEBM).
Power Automate flow
As we saw above, the app is calling a Power Automate flow that does all the heavy lifting of processing the audio or provided request text. The entire flow is in below screenshot and I’ll go over most interesting parts next.
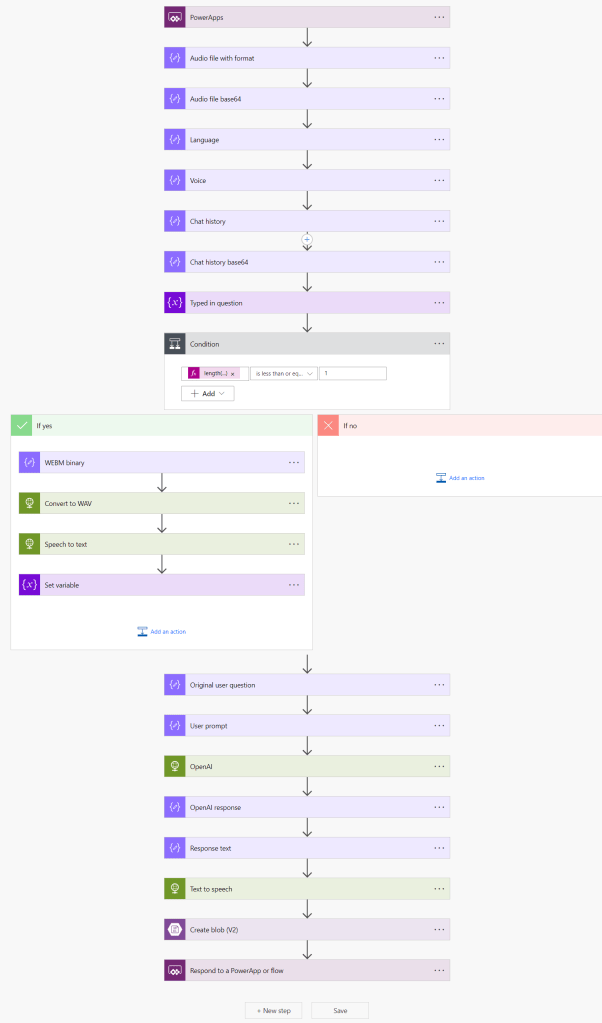
The first few Compose actions are merely to extract trigger parameters, nothing special there.
The first interesting stuff happens in condition’s true branch where we enter if the user has used the microphone to create the request (instead of typed in text).
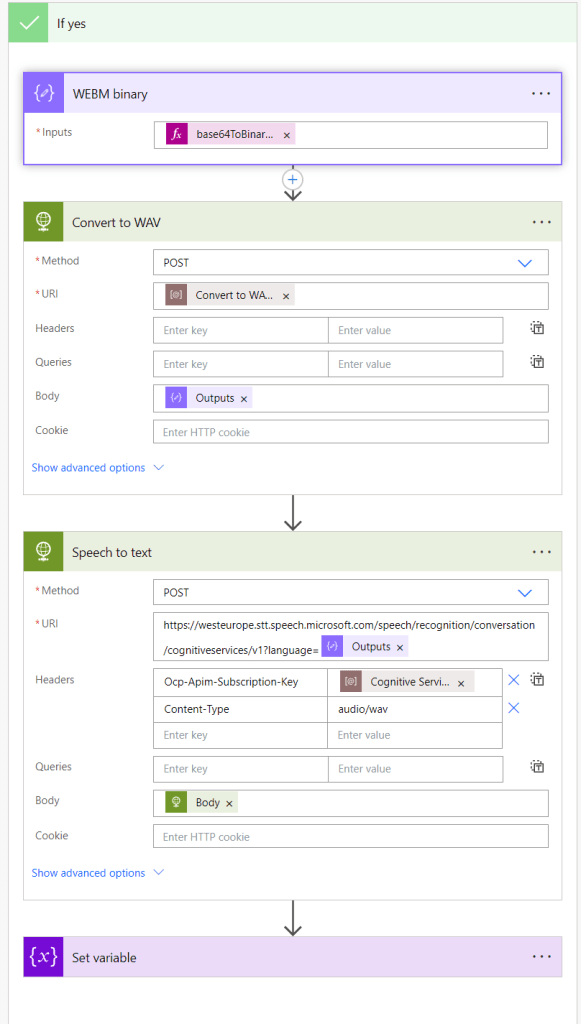
Actions:
- Convert Base64 encoded recording into binary format using base64ToBinary funtion:
base64ToBinary(outputs(‘Audio_file_base64’)) - HTTP request to call Azure Function App endpoint that converts the audio file into WAV format. (See the next chapter for details)
- HTTP request to Azure Cognitive Service endpoint to convert the WAV audio file into text
- Set converted text into a variable
Next interesting part happens when we make a call to OpenAI endpoint.
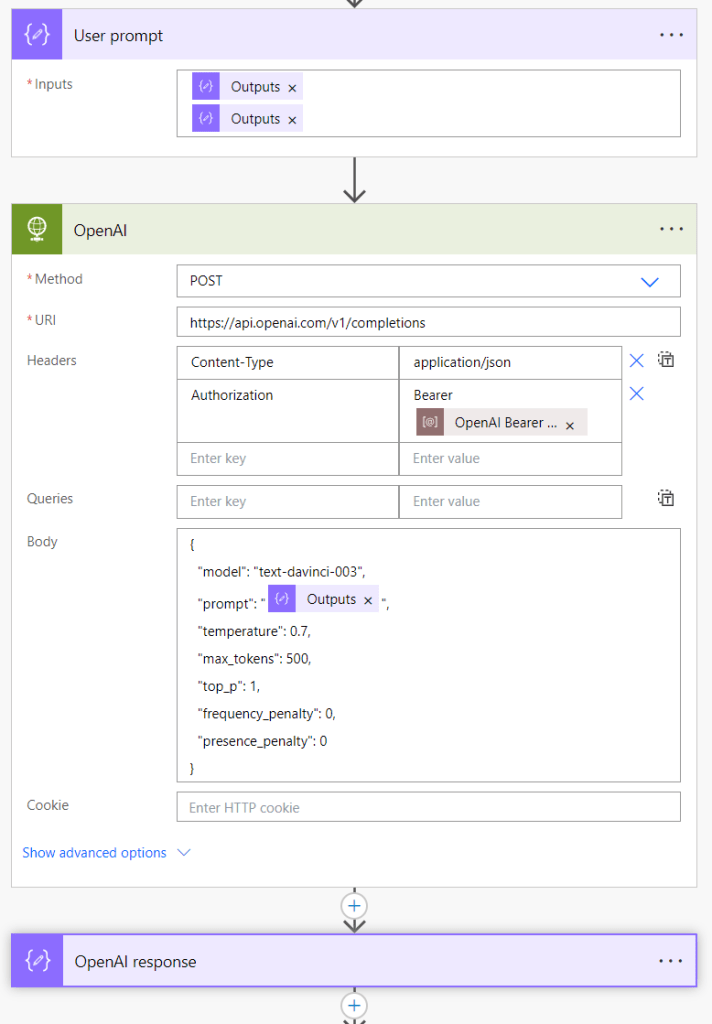
First we create the prompt text by combining the earlier chat history with the latest user request (either created via microphone or in plain text from the app). Next we use this prompt text along with other parameters when we POST an HTTP request to OpenAI completions endpoint. If you want to dig deeper into what different parameters in the JSON mean, check out this documentation.
The last few steps involve converting text into audio file, storing the audio file in the blob storage and returning URL and textual response back to the app.

Azure Function App to convert audio into WAV format
As Cognitive Service speech-to-text does not understand audio formats created by canvas app’s microphone control, we need to convert the recording into WAV. This is done with a Azure Function App and C# code that is listed below. Please not that the code is borrowed and adjusted from Yash Kamdar’s blog post 🙏.
using System;
using System.IO;
using System.Threading.Tasks;
using Microsoft.AspNetCore.Mvc;
using Microsoft.Azure.WebJobs;
using Microsoft.Azure.WebJobs.Extensions.Http;
using Microsoft.AspNetCore.Http;
using Microsoft.Extensions.Logging;
using Newtonsoft.Json;
using System.Diagnostics;
using System.Net.Http;
using System.Net;
using System.Net.Http.Headers;

namespace PowerApps.TalkWithChatGPT
{
    public static class ConvertToWAV
    {
        // https://kamdaryash.wordpress.com/2020/02/05/create-a-pdf-file-of-text-converted-from-speech-recorded-in-powerapps-using-azure-cognitive-services-part-2/

        [FunctionName("ConvertToWAV")]
        public static HttpResponseMessage Run(
            [HttpTrigger(AuthorizationLevel.Function, "post", Route = null)] HttpRequest req,
            ILogger log)
        {
            var temp = Path.GetTempFileName() + ".source.audio";
            var tempOut = Path.GetTempFileName() + ".wav";
            var tempPath = Path.Combine(Path.GetTempPath(), Guid.NewGuid().ToString());
            Directory.CreateDirectory(tempPath);
            using (var ms = new MemoryStream())
            {
                req.Body.CopyTo(ms);
                File.WriteAllBytes(temp, ms.ToArray());
            }
            var bs = File.ReadAllBytes(temp);
            log.LogInformation($"Renc Length: { bs.Length}");
            try
            {
                var psi = new ProcessStartInfo();
                psi.FileName = @"D:\home\site\wwwroot\ffmpeg.exe";
                psi.Arguments = $"-i \"{ temp}\" \"{ tempOut}\"";
                psi.RedirectStandardOutput = true;
                psi.RedirectStandardError = true;
                psi.UseShellExecute = false;
                log.LogInformation($"Args: { psi.Arguments}");
                var process = Process.Start(psi);
                process.WaitForExit((int)TimeSpan.FromSeconds(60).TotalMilliseconds);
            }
            catch (Exception ex)
            {
                log.LogInformation(ex.Message);
            }
            var bytes = File.ReadAllBytes(tempOut);
            log.LogInformation($"Renc Length: { bytes.Length}");
            try
            {
                var response = new HttpResponseMessage(HttpStatusCode.OK);
                response.Content = new StreamContent(new MemoryStream(bytes));
                response.Content.Headers.ContentType = new MediaTypeHeaderValue("audio/wav");
                File.Delete(tempOut);
                File.Delete(temp);
                Directory.Delete(tempPath, true);
                return response;
            }
            catch (Exception ex)
            {
                log.LogError(ex.Message);
                throw;
            }
        }
    }
}
The above code is quite simple. Basically it uses ffmpeg.exe converter app to transform the input audio into WAV file.
Installation instructions
Simple installation steps are provided along with my GitHub repository.
