It is not uncommon that you need to get input from external parties as a step within your various business processes. You might need to collect approvals from stakeholders, for example. Or you need to contact your customer to get more information regarding a service order they created earlier.
In a very, very, very simple case you might make it with Microsoft Forms, but in a real business scenario that rarely is the case due to the multiple limitations it has.
Often it might be a good idea to set up some kind of extranet solution to support these scenarios. You could use Power Apps portals, for example, to enable external parties to log in and to work on the data stored in your Dataverse database. Or you could set up a SharePoint extranet to allow guest users to collaborate on documents and lists. One valid option, of course, is to invite these users to join one of your Teams channels to collaborate and communicate.
Sometimes, however, you will need something much more lightweight and more ad-hoc than options above. I am a fan of Power Automate flows and I am gradually falling in love with Adaptive Cards as well. In this blog post I’ll be demonstrating you how you can combine the two to create an attractive and somewhat simple solution to collect information from external parties.
Simple business case
Let’s say we have a billing process that is partially automated. Currently, however, if we’re missing some of customer’s billing information, the process gets manual: service desk needs to call the customer or send an e-mail to collect the additional information and then manually enter that information to the system. Only after this can the billing process continue.
In our case we want to extend the automation so, that if some of customer’s billing information is missing, we will automatically send an e-mail to the customer containing a link that customer can use to fill in the missing information. This way we can collect the information and get it stored directly to the system without manual involvement!
Solution
So how can we do that? We need to provide a link for the customer that can be used to fill in the missing information for that specific party. And I promised we will be doing this with Power Automate flows and Adaptive Cards only – we’re not setting up additional web servers here, folks!
I wrote a blog post while back, where I played with an idea that we could use Power Automate flow with HTTP GET trigger to render an HTML form and use that to collect information from an external user. Basically I am now extending the idea with Adaptive Cards so that the solution becomes even more compelling option for business users.
Create Adaptive Card
Let’s start by creating the adaptive card for our needs! Basically adaptive card is a block of JSON that describes the contents and the actions on the card. Our card contents will consist of the following input fields and of some text and actions:
- Checkbox whether the billing address is the same as the address stored in our system
- Name
- Street address
- City
- Zip code
- Country
It is up to the client to decide how to render the card for the end user. For example, a bot will display the card in a bit different way than how an e-mail client will render the card embedded in an e-mail message.
But we will not be using a bot client nor Outlook – we will render the card on a web page utilizing the JavaScript SDK.
But first, let’s design the card!
I created the adaptive card with the online designer. The card is quite simple.
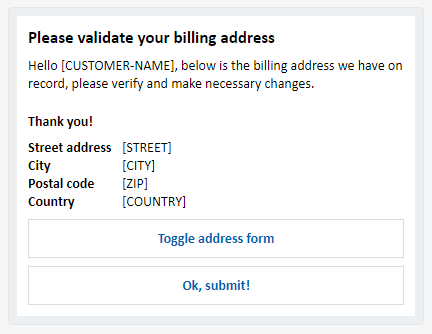
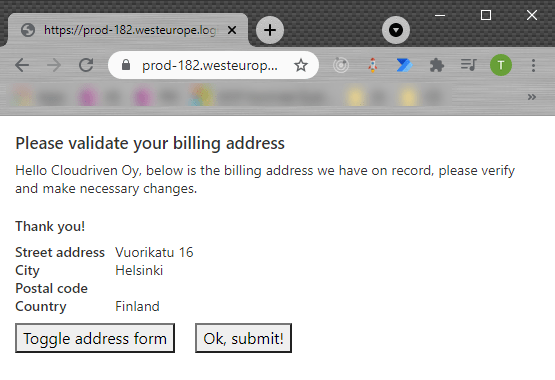
A welcome message and short instuctions are displayed as well as current billing address information. The user can fill in missing or faulty information by using the toggle button do show and hide the edit fields.
Flow 1: render the adaptive card
It is a business requirement that we can provide a link to be sent along with an e-mail message. When the customer employee clicks on the link, he or she is directed to a web page where the adaptive card with all the prefilled information is displayed.
The flow consists of five steps, including the trigger.

When a HTTP request is received trigger is configured to accept GET requests and with one relativePath parameter that is used to identify the correct customer.

Note. You could also use a second parameter to enforce more secure validation of the caller. For example with a relativePath similar to below, you could later in your flow make sure that the securityToken matches the one you have hard coded in your flow, or even the one defined for the specific customer. You could also enable a scenario where the link can be only used once, by storing the securityToken along with the customer record and invalidating it with the first call. Or you could record a some sort of timestamp to set the link to be valid only for a specific amount of time.
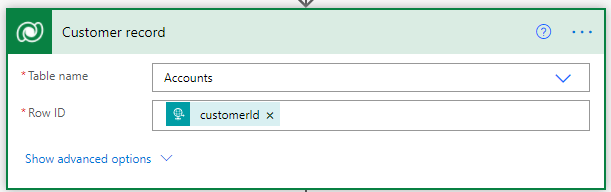
id/{customerId}/t/{securityToken}The next step is to fetch customer information (in our case an account from Dataverse database) identified by the customerId parameter.
With information received from Dataverse we can finalize the actual adaptive card JSON that we have copied from Adaptive Cards Designer. Inputs value of the Compose billing address adaptive card payload is below.
{
  "type": "AdaptiveCard",
  "body": [
    {
      "type": "TextBlock",
      "size": "Medium",
      "weight": "Bolder",
      "text": "Please validate your billing address"
    },
    {
      "type": "ColumnSet",
      "columns": [
        {
          "type": "Column",
          "items": [
            {
              "type": "TextBlock",
              "spacing": "None",
              "text": "Hello @{outputs('Customer_record')?['body/name']}, below is the billing address we have on record, please verify and make necessary changes.",
              "wrap": true
            },
            {
              "type": "TextBlock",
              "spacing": "Medium",
              "text": "Thank you!",
              "wrap": true,
              "weight": "Bolder"
            }
          ],
          "width": "stretch"
        }
      ]
    },
    {
      "type": "FactSet",
      "facts": [
        {
          "title": "Street address",
          "value": "@{outputs('Customer_record')?['body/address1_line1']}"
        },
        {
          "title": "City",
          "value": "@{outputs('Customer_record')?['body/address1_city']}"
        },
        {
          "title": "Postal code",
          "value": "@{outputs('Customer_record')?['body/address1_postalcode']}"
        },
        {
          "title": "Country",
          "value": "@{outputs('Customer_record')?['body/address1_country']}"
        }
      ]
    },
    {
      "type": "Input.Text",
      "placeholder": "Provide street address...",
      "id": "street",
      "isVisible": false,
      "value": "@{outputs('Customer_record')?['body/address1_line1']}"
    },
    {
      "type": "Input.Text",
      "placeholder": "Provide city...",
      "id": "city",
      "isVisible": false,
      "value": "@{outputs('Customer_record')?['body/address1_city']}"
    },
    {
      "type": "Input.Text",
      "placeholder": "Provide zip code...",
      "id": "zip",
      "isVisible": false,
      "value": "@{outputs('Customer_record')?['body/address1_postalcode']}"
    },
    {
      "type": "Input.Text",
      "placeholder": "Provide country...",
      "id": "country",
      "isVisible": false,
      "value": "@{outputs('Customer_record')?['body/address1_country']}"
    }
  ],
  "actions": [
    {
      "type": "Action.ToggleVisibility",
      "title": "Toggle address form",
      "targetElements": [
        "street",
        "country",
        "zip",
        "city"
      ],
      "id": "toggle"
    },
    {
      "type": "Action.Submit",
      "title": "Ok, submit!",
      "data": {
        "customerId": "@{outputs('Customer_record')?['body/accountid']}"
      }
    }
  ],
  "$schema": "http://adaptivecards.io/schemas/adaptive-card.json",
  "version": "1.3"
}
The JSON is exactly the same copied from the Adaptvie Cards Designer, except that I have replace customer related information with the actual values from the database.
Notice also in the last highlighted part, how I have prefilled the form data with customerId. This means that we will send customer’s id along with updated address information to the next flow.
You must also define id values for each of the form’s input controls – otherwise their data won’t get collected when submitting the form.
The step Form post URL is simply to record the URL to which the information should be posted when the user submits the form. It is the trigger URL of the Flow 2, which I’ll cover later.
The final step is to send an HTTP response back to the caller. We are sending the response with status code 200 (OK) and with one additional header defining that content type of the reponse is text/html. With this, caller’s browser attempts to render the response as an HTML page, which is exactly what we want!

The body of the response is below. I’ve highlighted some of the lines which I’ll cover next.
<html>
<head>
    <link rel="stylesheet" href="https://cdn.jsdelivr.net/npm/bootstrap@4.6.0/dist/css/bootstrap.min.css"
        integrity="sha384-B0vP5xmATw1+K9KRQjQERJvTumQW0nPEzvF6L/Z6nronJ3oUOFUFpCjEUQouq2+l" crossorigin="anonymous">
    <script src="https://unpkg.com/adaptivecards/dist/adaptivecards.js"></script>
</head>

<body>
    <script type="text/javascript">
        var card = @{outputs('Compose_billing_address_adaptive_card_payload')};
        // Create an AdaptiveCard instance
        var adaptiveCard = new AdaptiveCards.AdaptiveCard();
        // Host Config defines the style and behavior of a card
        adaptiveCard.hostConfig = new AdaptiveCards.HostConfig({
            fontFamily: "Segoe UI, Helvetica Neue, sans-serif"
            // More host config options
        });
        // Set the adaptive card's event handlers.
        adaptiveCard.onExecuteAction = function (action) {
            console.info(action);
            var xhr = new XMLHttpRequest();
            xhr.onreadystatechange = function () {
                if (this.readyState != 4) return;
                if (this.status == 200) {
                    var data = JSON.parse(this.responseText);
                    // Parse the card payload
                    adaptiveCard.parse(data);
                    // Render the card to an HTML element:
                    var renderedCard = adaptiveCard.render();
                    // And finally insert it somewhere in your page:
                    document.body.appendChild(renderedCard);
                }
            };
            xhr.open("POST", "@{outputs('Form_post_URL')}", true);
            xhr.setRequestHeader('Content-Type', 'application/json');
            xhr.send(JSON.stringify({
                value: action.data
            }));
        }

        // Parse the card payload
        adaptiveCard.parse(card);
        // Render the card to an HTML element
        var renderedCard = adaptiveCard.render();
        // And finally insert it in the page
        document.body.appendChild(renderedCard);

    </script>
</body>

</html>
Line 5: Include Adaptive Cards JavaScript SDK. This library is responsible of rendering the defined card JSON as a block of HTML and JavaScript.
Line 10: Define the contents of the local card variable to contain the card JSON crafted in the flow step Compose billing address adaptive card payload.
Lines 18-39: Register an event handler that gets called when the user submits the form. The event handler receives an action object as a parameter, which contains a data object among other things. The data object holds all the data entered in the form as well as the data provided in the definition of the submit action.
21: Initialize XMLHttpRequest object to prepare for posting the form data
22: Register a new event handler to watch the status of the HTTP request
24: Check if everything is ok (200)
25-27: Parse response as a new adaptive card
29-31: Render and add the card on the page
34-35: Further configure the request, e.g. set content type and URL
36-38: Send the action.data value as the body of the HTTP POST request
Lines 41-46: Use the SDK to parse the JSON as an adaptive card, turn it into an HTML element and add it to the page.
With that, when the trigger URL of the flow with correct customerId is called with a browser, the user is presented with a card like this:
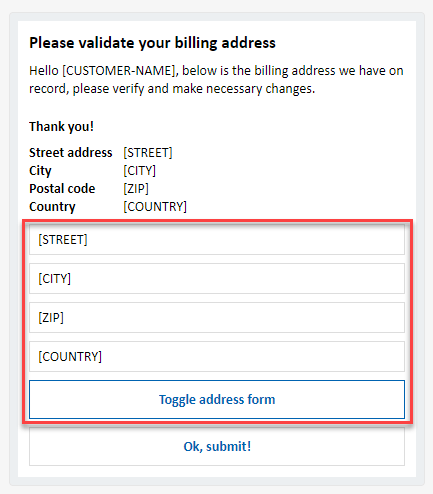
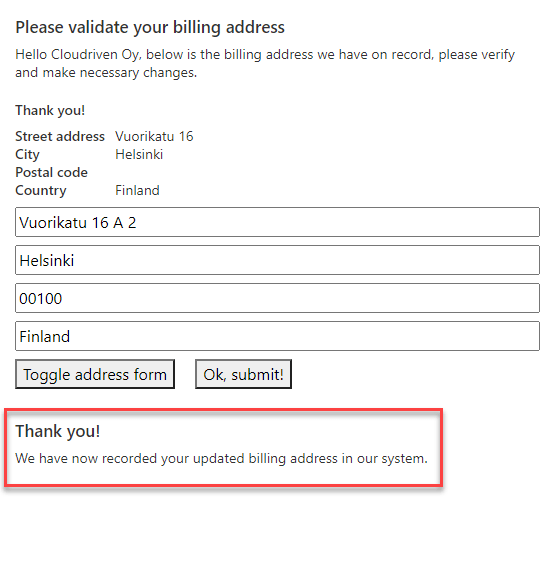
And when toggling the form:

When the user click on the Ok, submit! button, a post to the second flow is done and the adaptive card received as a response is displayed below the first adaptive card:
Flow 2: handle the form posting
The second flow consists only of three steps including the trigger.

In this flow the trigger is also When a HTTP request is received. However, this time we only accept POST methods and we don’t need to use the relativePath, since we’re receiving the customerId as part of the payload of the request. The simple trigger body JSON shema is below.
{
    "type": "object",
    "properties": {
        "value": {
            "type": "object",
            "properties": {
                "customerId": {
                    "type": "string"
                },
                "street": {
                    "type": "string"
                },
                "city": {
                    "type": "string"
                },
                "zip": {
                    "type": "string"
                },
                "country": {
                    "type": "string"
                }
            }
        }
    }
}
The next step in the flow is to update the customer data in the backend system.
The last phase is to return a result to the caller. I am returning another adaptive card JSON to display a confirmation message to the user as shown in the previous section.

Note, that this time we don’t need to return full HTML page, since the page rendered by the previous flow handles that. We can simply return the adaptive card JSON. Therefore the Content-Type header value is set to application/json instead of text/html.
{
  "type": "AdaptiveCard",
  "body": [
    {
      "type": "TextBlock",
      "size": "Medium",
      "weight": "Bolder",
      "text": "Thank you!"
    },
    {
      "type": "ColumnSet",
      "columns": [
        {
          "type": "Column",
          "items": [
            {
              "type": "TextBlock",
              "spacing": "None",
              "text": "We have now recorded your updated billing address in our system.",
              "wrap": true
            }
          ],
          "width": "stretch"
        }
      ]
    }
  ],
  "$schema": "http://adaptivecards.io/schemas/adaptive-card.json",
  "version": "1.3"
}
Flow 3: wrap it all up
Flow 1 is now capable of rendering the HTML web page to the end user and Flow 2 handles receiving the post data from that web page. But we still need a flow to generate the link and send it to the customer.
I created a flow that is triggered with Manually trigger a flow trigger. This way we can easily call the flow as a child from from some other parent flow whenever needed. The trigger receives the customer ID as a parameter.

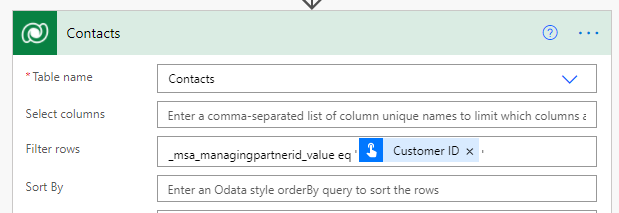
The next step is to use that id to fetch all the contacts for the customer.
The next two data operations create the link that will be inserted into e-mails. Web form link template merely holds the URL copied from the trigger of the Flow 1.

{customerId} is then replaced with the actual customer id in the Web form link step.
replace(outputs('Web_form_link_template'), '{customerId}', triggerBody()['text'])See it in action!


Hi, thanks much for your excellent post. I’m recreating it as you describe to get more familiar with the process, but I’m stumped by a step that isn’t even about the adaptive cards…When you fetch all contacts for the customer by supplying {customerid},
1) is Contacts a custom table you created? How is it associated with the Accounts table?
2) What kind of value is {customerid}, is it a GUID? Where do you get it?
3) Why is the OData query filtering on _msa_managingpartnerid_value? That seems an odd choice?
Kind regards, Robert
LikeLike